Showing posts with label Recipe. Show all posts

Monday, March 4, 2013

Pear, Pesto, Pinenut, Gorgonzola Pizza. Mmm!

So, we discovered this pizza as an hors d'oeuvre at a wonderfully expensive restaurant, and fell in LOVE.  

We came home and tried for several months to recreate it.  What we devised it the merger between ungodly levels of expense and work, and divine amounts of tastiness.  

This is a quick and dirty path to deliciousness.

Step #1:  Buy good quality whole wheat tortillas.  (Or make your own crust and feel smug.)  Slather with good quality basil pesto.


Step #2:  Add sliced pears.  We use canned pears, because they're mildly pre-cooked, but if you want to make your life complicated (and possible elevate the taste) feel free to precook your own pears.


Step #3:  Add toasted pinenuts.  


Step #4:  Sprinkle Gorgonzola cheese - don't use too much.  A little is perfect.


Step #5:  Broil in your oven until crispy, and until pears are golden.  We've tried using a cookie sheet, a perforated cookie sheet, and a pizza stone; best results seem to be on the perforated cookie sheet - but honestly, we've never quite gotten thoroughly crispy crust.  The center is always a bit soft.  Let me know if you figure out how?


But seriously.  This is amazing.  You must try it.  You will want to eat more than is healthy for you.  But really, it's quite healthy!

Tuesday, October 2, 2012

Deployment Journal - Day #80

Husband really misses cooking.  Like, making his own food - using spatulas, measuring cups, spices - here in our kitchen.  He also misses familar food.  So, I've been scheming, testing recipes, and trying to devise ways to bring food (and cooking) to him.   I deduced that he has access to a microwave and small refrigerator.  And I realized that, with those two things, he could make no-bake cookies.  From scratch.  So, I sent him a few supplies and the following recipe... and he was ecstatic.


J  Peanut Butter & Nutella Cookies – Deployment Style  J
Ok, pleeeeeease read these directions.  I’m being a little OCD here, but I think my tips may help you to make these cookies with as little inefficiency (read: lost sleep/frustration) as possible  J
 
Alright, I’ve sent you two, 4-Cup Glad Containers.  In one of them, the (2 cups) Brown Sugar, (1/4 Cup) Cocoa Powder, and dash of salt are premeasured. 
 
You will need to gather from your stash:
 
-          One jar with the liquid (sharpie) measurement markings on it (you’ll need to measure ½ cup)
-          Your dry measuring cups (you’ll only use the 1 Cup measure, tho’)
-          Milk (made from your dry milk powder – this recipe uses ½ cup)
-          Coconut oil
-          Oats
-          1 fork, 1 spoon, and a spatula/plastic knife, if possible
 
In the box, I’ve included a snack-sized container of Creamy JIF Peanut Butter, one small jar of Nutella, wax paper, and 8x8 tin baking dishes.  Assemble everything near a microwave and a table/counter/floor/horizontal surface. 
 
Preemptively make room in your fridge (or freezer) for the tin baking pan(s) – and then line of the tin pans and several broken-down cereal boxes with wax paper.  (We’re going to use them as cookie sheets!  Brilliant, no?  You really could use anything that’d fit in the fridge and stay semi-stiff; plastic files, manila folders, etc.)  You’ll ultimately need 2-3 cookie-sheets-worth of space for the cookies to chill. 
 
Then, take your jar with the ½ cup measurement marking and fill it with less than ½ cup coconut oil; microwave in 3-5 second increments to melt the oil, and gradually add more until it’s exactly ½ cup.  Pour the oil into the Glad container with the sugar/cocoa/salt.  Then, measure ½ cup milk, and pour it into the same container, too.  Mix with fork, until thoroughly combined.   It will be runny.
 
Pour half the runny mixture into the other, empty Glad container.  (This doesn’t have to be precise – just divide it semi-equally.)   Then, microwave each container cautiously, bringing the mixture to a boil.  But seriously, be careful.  The mixture puffs up when it boils, which is why you needed to divide it.  Try to boil each for roughly 60 seconds.  But, don’t let it explode/boil over either.  J  And please, don’t burn your hands; the plastic will be hot.
 
Quickly re-combine all hot liquid into one Glad container.  Then, scoop out the peanut butter, and add to Glad container of hot liquid.  Try to scrape it all out .  Then, refill the same (formerly PB) container with Nutella – equally, but generously.  J  Stir everything again, letting the PB and Nutella melt in. 
 
Now, measure 3 cups of oats into the NON-wax-paper-lined tin pan.  Pour the containers of hot liquid over the oats.  Mix gently with fork, til all oats are covered in the mixture.  Spoon piles on wax paper/”cookie sheets.”   Put the cookies as close together as possible; they won’t spread out much at all.  Try to move quickly, since the mixture gets stiffer as it cools.  This recipe makes 24-30 cookies, depending how big you make ‘em. 
 
Chill for at least an hour – overnight would be ideal.  After they’re chilled, you can pile them onto each other in the tin pans, and the Glad containers, so you won’t have to use up much refrigerator real-estate for long.  They allegedly freeze well/taste delicious frozen.  Hope that helps  J  I bet they won’t last long, though…
 
… Just think of this as me bringing cookies to your office.  They won’t help anyone’s diet, but I hope you all enjoy them! 
 
I love you!!!

Wednesday, February 16, 2011

3 (More) Cheap Meals

1) Breakfast for Dinner:  Omelettes, Oatmeal, Dutch Baby Pancakes...
 

Who in their right mind decided that restaurant omelettes should cost $8-10?!  The actual cost of an omelette (assuming 1-2 veggies, and a healthy amount of cheese) hovers right around $1.  Yup.  Not even kidding.  Using 6 eggs, 1/2 minced green pepper, 1/2 a diced onion, and a sprinkle of cheese - you can feed 3 adults nicely.  In other news, instant oatmeal actually saves you hardly any time (despite the "instant" marketing - boiling oats the old fashioned way takes around 3 minutes) and costs you alot of extra money.  Try using the "stovetop" formula on the side of the Quaker Oat canister, to economize your breakfast.  Finally, ever hear of Dutch Baby Pancakes?  Basically the best combination of flour, butter, milk, and eggs EVER...

Note:  The "pancake" is supposed to puff up, and then fall.  So, don't freak out.
Total Cost (three servings):  Under $3.

2) Beef and Barley Soup
Now, you're about to protest that beef is expensive.  I agree.  Mildly.  But, not if you shop at Paul's, and not if you use a crockpot (which, on low for 8-12 hours, can render ANY cut of beef into a tender, mouth-watering substance).  And barley, let me just brag on you a moment.  Barley is SUPER good for you, and SUPER inexpensive.  Barley lowers cholesterol in study after study, and is a yummy part of a fiber-rich diet.  Barley tastes delicious, and uses only water to cook.  Conclusion: Barley is our friend. 

To make this soup, simply put 1-2 lbs of beef into your crockpot at O'Dark-Thirty (10-12 hours before you want to serve it), with about 1-2 cups of water, any spices you like, carrots/onions, and a spoonful of Beef Better-Than-Bouillon (if you want extra-delicious broth).  Then, leave the lid on.  Seriously.  That is the hardest part.  Eventually, a few hours before supper, boil the barley in a TON of water (at least three times as much water as barley) and after it's thoroughly cooked, add it to the crockpot.  (I prefer this method, because then my barley absorbs less of my yummy broth  :-))  This meal will also stretch for a while - and costs as little as you want.  Water is free, beef is negotiable, and barley is cheap.  So are carrots, and onions.

Total cost per meal (2-3 servings): Under $2.

- Pork (or ham) and Bean Soup

If you live where we live, hearty soup dinners are a balm to your soul.  Kinda like how chapstick staves off that searing wind out there?  You know exactly what I mean...

So, try putting 1 diced onion, 2 diced carrots, 2 lbs of pork (or ham), one bag of mixed "soup" beans, (presoak them for at least 1-2 hours - overnight is best), and 2 tbsp soy sauce in your crockpot (exclude if you're using ham).  Cover liberally with water.  Cook for about 8-10 hours.  Season with bay leaf/Mrs. Dash, salt/pepper as you like.  The entire pot will cost you under $5, and will last you for, like, a week.  Not even kidding.  Freezing is recommended, after Day #3.  Not because it won't keep in your fridge - it will, indefinitely.  Mostly because you'll be sick of it, long before it runs out.

Total cost per meal (2-3 people): WAY Under $2.

Wednesday, February 9, 2011

3 Cheap Meals

These are for the times when money (savings) outranks nutrition (within reason - we still don't advocate ramen-level-departures from health...)  I hereby acknowledge that these (at least, #1 and #2) aren't diet foods.  However, they make great family meals.

1)  Fried potatoes with ham and onions. 

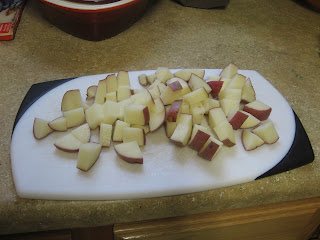
This one is easy (and one of husband's favorite).  Saute one chopped onion in (minimal) olive/coconut oil, then set them aside.  Chunk red potatoes (6 or so) and fry them on medium-high (in the pan with the previously-used onion oil) until crispy, then add the onions and one package of diced ham ($1 at the commissary).  Salt and pepper to taste (and ketchup, if you like) make this a comfort-food winner.

Total Cost for 2-3 People:  WAY Under $3.

2)  Fried Rice. 

You can do this the junky way - with a cheap, instant, boxed mix (complete with three days' worth of sodium) - or you can do it the old fashioned way and spend roughly the same amount and have a much healthier meal.  Just scramble 2 eggs (approximately $0.50, even if you buy the organic kind, like we do), cook brown rice, then remove the eggs from the pan, add a tad of oil, and combine the rice, frozen mixed veggies (any kind!), and scrambled eggs.  Add a smidge of soy sauce, if feeling indulgent.  ;-)  (Ditto to making your own chow mein - just saute sliced cabbage and soy sauce and noodles.)
Total Cost for 2-3 People:  WAY Under $2.

3)  Rice and Beans. 

At $2.00 per 2 lb. bag, one serving (1/4 cup uncooked rice) is exactly $0.10.  Not joking.  Beans are similar, if you're willing to buy the dry kind, then soak and gently simmer/cook them yourself.  Which isn't hard.  =)  Then, add whatever you like/can afford! Avoid/minimize using cheese, sour cream, avocados, and pre-made salsas, as they cost more per ounce.  But, pork is an inexpensive meat to include, (especially from Paul's) as is chicken (sometimes).  Also try diced celery, raisins, corn, (think: Chipotle) tomatoes, onions, cilantro, a splash of lime, and sea salt... mmm!
And guess what?  You're still WAY under $1, per serving.  WAY under $2, for 3 portions.

... and now, don't you feel inspired?!  In spite of today's undulating economy, rising gas prices, and exorbitant food costs, we can manageJust watch us, world.

Thursday, February 3, 2011

*Addictive* Guacamole

Essentials:

- 1-2 Avocados (ripe, but not-quite-dead/icky-squishy)
- About 1/6 of one juicy lime (give or take a little)
- Mrs. Dash (how could we surive without this stuff?!), to taste
- Seasalt, to taste
- Your favorite tortilla chips

Optionals:

- 1/4 Cup Minced Onion
- 2-3 Cloves of Garlic (squished through This, Our Favorite Gadget)
- Diced roma tomatoes (1/4 cup)

First, slice the avocado in the middle, like so, and remove the "seed" in the middle.  (Trick:  Try quickly spearing/whacking the seed with your knife, to snag it on the blade - then pull gently.  Beats trying to dig it out any other way!)
Then, we recommend you slice them in half, until you have this shape.  Then, peel the skin off easily.  (MUCH easier than shoveling the pulp out with a spoon.  Trust us.)
Next, take about this much lime, and squeeze it until there is no more juice.  (You can obviously adjust the size your slice - all limes are not equally juicy.)
Finally, sprinkle about two shakes of Mrs. Dash, and a few pinches of salt (again, adjust for your own taste), and TA-DA.... you have this!

Thursday, January 27, 2011

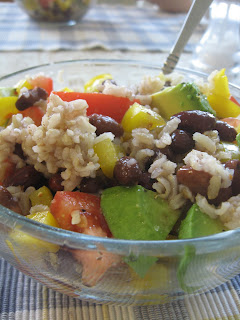
Rice. Beans. Peppers. Tomato. Avocado.

This is another staple meal in our home - we consume this at least once a week, sometimes twice or three times.  You can tweak the ingredients, or serve it with chips, or inside a warm tortilla.  *cravings begin here*  These amounts serve four-ish adults.

You'll need:

- 2 Cups cooked brown rice 
- 2 cans of beans, drained (any non-white kind -- kidney, navy, black, salad/mixed...) 
- 1 yellow pepper, diced (or red, or green, if you prefer)
- 2 avocados, diced (Costco always has amazing ones, if the commissary has none)
- 3 Roma tomatoes, diced
- Salt, pepper, Mrs. Dash, lime/lemon juice, cheese, whatever  =)

Ok, combine it all.

. . . .

Yup.  That's it!  No joke.

It'll look like this, at first...
And like this, after you stir it up...
And it is truly amazing.  We crave it.  I'm craving it right now.  Soooooooo tasty. 

Of course, you can add spices (minced garlic is great), and other veggies (corn is a favorite) and cheese (any variety), if you want...

But, the above, simple, affordable, 5-ingredient, nutritionally-complete option is stand-alone delicious.

Thursday, January 20, 2011

Bacon-Wrapped Asparagus

Per Michelle's request, (and because of the massive commissary sale) here are my instructions to make bacon-wrapped asparagus.  These provide amazing hors d'oeuvres for those last-minute barbecues and potlucks - people LOVE them!

Aside:  If you are on a diet, and prefer a low-fat option, I normally lightly steam our asparagus, then toss with coconut oil and seasalt/pepper.  Much healthier than bacon... 

Nonethless, we're infatuated with this delectable (non-low-fat) alternative.  =)

You'll need:

- One bundle of (thin) asparagus stalks
- Bacon (one package)
- Cookie sheet

Simply take each piece of bacon, and wrap it around 3-4 stalks of asparagus. 

Helpful Tip:  Before beginning wrapping, divide up your asparagus into the same number of "bundles" as the number of "bacon strips."  If possible.  :-)  Sometimes, it's impossible... but I like to avoid stray bits.

Trim the thick ends of the asparagus 1/2-1" - just far enough up to eliminate toughness. 

Put the bacon-wrapped stalks on a (non-perforated) cookie sheet or in a baking dish.


Cook them in the oven at 400 degrees, for about 15 minutes.  They will simmer in their own tasty oil, and you can pull them out whenever they look sufficiently "done" to your preferred "crispiness."  Mmm....!

Another tip;  If you want them to be MORE crispy, switch to "broil" for the last five minutes or so, but watch closely - they get crisp quite fast!  =) 

Transfer them to paper towels, to drain/minimize grease, before serving.

Alternative:  If you'd prefer using your grill (instead of your oven), you can use smaller bits of asparagus/bacon, and create mouth-watering kabobs like this...


But, it's only fair to warn you - your entire neighborhood might soon be hovering nearby, hoping for a sample.  =)

Thursday, January 13, 2011

Super-Food Stir-Fry!

We discovered the incredible virtues of stir-fry last year, while living perpetually in hotel rooms, equipped with only an electric skillet, a knife, and soy sauce packets (lifted from the friendly sushi stand, in the commissary.)  Finally, in the 23rd state, we created the following, uber-cheap, low-fat, high-protein, delicious combination of flavors.  =)

Necessities:  (With uber-informative links from my favorite website!)
-          Soy Sauce (I use low-sodium Kikkoman’s)  <-- Flavor  =)
-          Coconut Oil  <-- GOOD fat!  Eliminates BAD fat!
-          2 Green Peppers (Diced or sliced) <-- Vitamins/minerals
-          1 Can Garbanzo Beans  <-- Protein and more vitamins
-          1 Onion (Diced or sliced) <-- Vitamins/enzymes/immune support
-          4 Garlic cloves, minced/crushed <-- Immune system booster/enzymes
-          Brown Rice, cooked (1-2 cups) <-- Rice + bean = Complete protein

Optional:
-          Carrots (About 1 cup?  Diced, sliced, grated, whatever) <-- Vitamins galore
-          Mushrooms (8 oz, sliced)  <-- Great source of copper
-          Water Chestnuts (1 small can) <-- They add nice texture, haha
-          Celery (2 stalks, sliced/diced) <-- Great source of GOOD sodium/crunch

This time, I used the following combination of foods
First, dice the onions and carrots (if using carrots) and saute them in coconut oil...

Then, when they are partly cooked, add the garlic and green peppers...

Here, I add the mushrooms (I don't like mushy veggies, so I cook them only a bit) and the soy sauce, and put the lid on so it can all steam a bit, on medium-low...

Then I add the garbanzo beans (they're already cooked - they just need to warm up)

And the water-chestnuts (or celery, if you're using that - it adds a great "crunch")...

Fill the bowls with some rice... maybe 1/3 full?

And ta-da!  Delicious, nutritious, adaptable, and WAY affordable.  =)  Makes about 4-5 servings.


(Snowmen salt-and-pepper shakers are optional)

Wednesday, January 5, 2011

PWOC Couscous Recipe

This post is for the ladies of PWOC who, despite my insecurity over bringing “healthy” food to a kickoff event, kindly bestowed many affirmations upon me and even *gasp* asked for the recipe!  (Maybe they were just humoring me, and won't ever see this post, but it helps my ego to think they might, hehe.)

So, in honor of my fellow military wives, who shop at the same commisary as I, here is what you ate earlier:

-          2 boxes of “Near East” couscous (found near the rice) – I used one box of “Garlic/Olive Oil” flavor, and one box of “Toasted Pine Nut” flavor
-          2.5 Cups of Water w/ a TBSP of chicken “Better than Bouillon” (or bouillon cube)
-          1 package of pine nuts (if you want – they’re in the normal “nut” section)
-          1 Green Pepper, diced
-          Parmesan (grated, to taste)- we buy the actual cheese and grate it, to save money, but any kind would work, I think
-          Mrs. Dash (original flavor, to taste)
-          Lawrys Seasoned Salt (to taste)
-          Coconut or olive oil (2-3 TBSP - don't worry, it's a "good" fat)

Ok, so bring the water/bouillon to a boil,along with 2 TBSP oil, then remove from heat and add the couscous (just like the side of the box instructs).  Toast the pine nuts (if desired) in a frying pan with coconut/olive oil, or on a cookie sheet (lower fat option) – but beware; they burn.  Fast. 

Fluff the couscous with a fork, after ten minutes or so of “setting” and then add the pine nuts, the green pepper, the parmesan, salt, and Mrs. Dash.  (I probably used about ¼ cup of grated parmesan, two shakes of the Mrs. Dash, and one shake of the salt.)

Of course, you can change the ingredients – I often do.  Add minced onions, mushrooms, grated carrots, chopped celery, peas, corn, roma tomatoes, garlic, ginger, pretty much ANY vegetable or spice.  Whatever sounds good!

For example, tonight I had a tad of leftover couscous salad.  Not enough for dinner, but too much to toss out...

SO, I added a can of (drained) pinto beans, and the “tops” of three peppers (chopped, for a little extra substance  =)), then stuffed the peppers full, and topped with cheese...


I put them, uncovered, in a dish in the oven (with a smidge of water in the bottom) and baked for 30 minutes on 350 degrees.
 ... YUM!

Thursday, December 30, 2010

Perfect Salmon Recipe

In the beginning, my dear husband could barely chop an onion.  But, he had a natural penchant in the kitchen, combining spices and flavors like a natural chef, and suddenly... his meals were frequently better than mine!  Which is, honestly, an awesome thing.  Even if it threatens my ego.  ;-)

Despite his brilliant innovation, some of our favorite recipes remain the classic ones – like this salmon-baking method, which my parents learned from their Washington-state-neighbor, when THEY were newlyweds.  It truly is the easiest, most-impossible-to-mess-up way to cook salmon.  

Husband recently perfected it, and here is photographic proof that this meal is amazing.  And uber-simple.

You'll need:

-          Salmon (mostly-thawed is ideal for these cooking times) – chunks, fillets, or the entire fish will work equally (DO remove the head/insides though)
-          COLD Butter slices
-          1 Lime
-          Salt, Pepper, and Dill (if you like dill – we don’t)
-          Tin-foil
-          Cookie cheet or baking dish (anything with edges, to prevent juice leakage/oven messes)

First, lie the fish on the tinfoil (enough to generously enclose the fish, and seal firmly shut), on a cookie sheet.

Cut deep slices in the fish chunks, (don’t cut entirely through the fish, but do cut deeply) and insert butter pads into them.  Squeeze lime over fish, then salt/pepper it.

(Or, if you’re working with the entire fish, filet it and put butter pads inside, then re-close the fish)

Put in the oven, at 400 degrees, for 15-18 minutes (if using roughly the amount of fish pictured above). 

Or until your fish looks whiter-than-it-was (but still pink), and "flakes apart."

Then, if you are my dear husband, you will slice zucchini and drop it in boiling water for a mere 1 minute (to prevent sogginess), then promptly drain and top with parmesan cheese… mmmm!


And you will chop some red potatoes to fry in coconut oil, and seasoned salt…


And you will produce this, in under 30 minutes.  AMAZING, no?  But, oh-so-reproducible  =)  You can make this, too!  This recipe never fails.  Just try it.  Honest.

Thursday, December 23, 2010

Simplest Clam Chowder EVER

Disclaimer #1:  This recipe presumes that you enjoy the taste of cream cheese.
Disclaimer #2:  This recipe does not claim to be "the best" clam chowder in creation - just dern close. 

Oh, but it's definitely the easier.  Ever.  No contest.  

You'll need:

- 3-4 (ish) Red potatoes, chopped
- 1 Onion, chopped
- 1 "box" of Cream Cheese
- 2 Cans of Clams
- Milk, Salt, Pepper, Dill, Butter, etc.  However much you want, for flavor.  :-)

Instructions:

Chop potatoes, and onions, and put in pot - see?


Boil them until tender (about 10 minutes).  Then, drain pretty much all the water.  (Don't bother to add any spices to the water, since you'll be draining it so quickly...)


Add hunk of cream cheese...


Add clams, INCLUDING the juice...


Like sooooooo....


Reheat.  Stir.  Add any spices your heart desires, and as much milk as you want - we like ours thicker, so I add about, um... one splash. 

(Wow - what a culinary term!  "One Splash."  I know, I know - I need to trademark that...)

Incredibly yummy!